7 · Mechbase on your phone (iOS & Android)#
The iOS and Android apps are purpose-built field tools: they let your crew walk routes, take readings, photograph equipment, and capture thermal images and vibration signatures right at the machine — fully offline if there’s no signal — and sync it all back to Mechbase automatically. This chapter explains what the apps are and how a technician uses one on a round.
What the apps are#
The apps are fully native — built with each platform’s own toolkit (SwiftUI on iPhone and iPad, Material 3 on Android) rather than a web page in a wrapper. They share your Mechbase account and the same plant data — the installations, sections, zones, assets, measurement points, and routes from the earlier chapters — but they are focused on the work that actually happens on the floor:
Walking inspection routes and recording each check.
Capturing readings on the spot — by hand, and from thermal and vibration sensors connected to your phone.
Photographing equipment — asset photos and each point’s reference photo.
Working offline, then syncing when you’re back in range.
Think of the web as where you set things up and analyse trends, and the apps as where the readings come from. Anything captured on a phone — a value, a photo, a thermal hotspot, a vibration signature — flows into the same measurement points and trends you read on the web (Working with assets and Measurements, trends, and alarms).
Installing and signing in#
Install the Mechbase app on the phone or tablet you’ll use in the field (your administrator will tell you where to get it for your organisation), then sign in with the same account you use on the web: type your email in the Username field, and your password. There’s no separate mobile account — your site access comes with you. After signing in you land on the home hub.
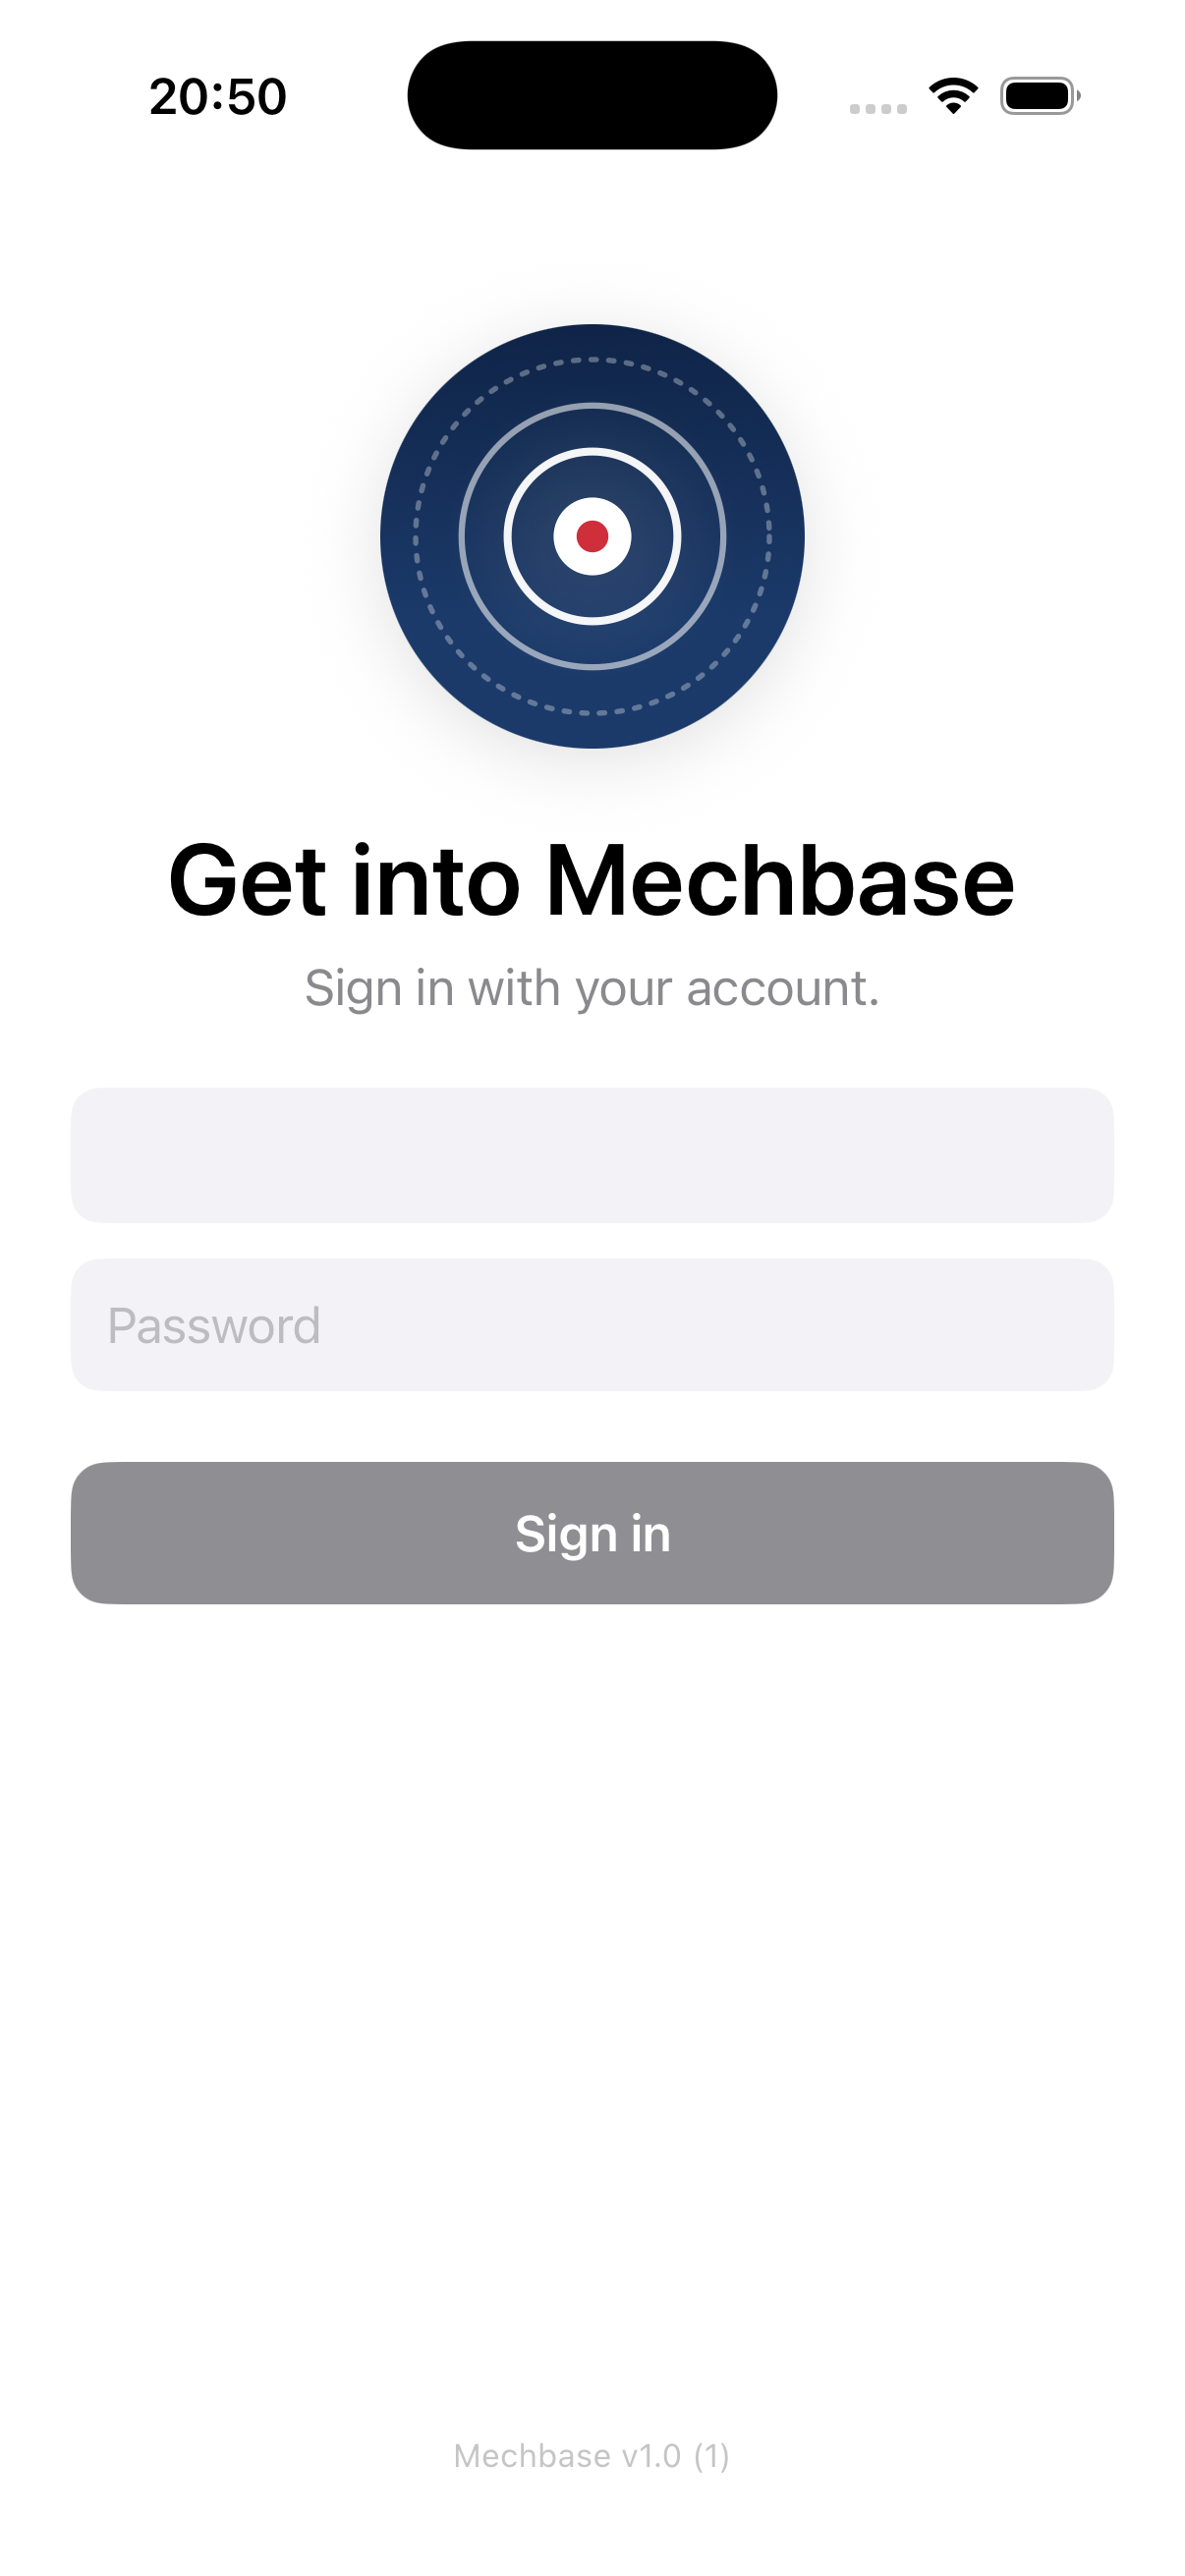
Note: Microsoft single sign-on is web-only for now; on the phone, sign in with your Mechbase email and password.
The home hub#
The home hub is your base on the phone.
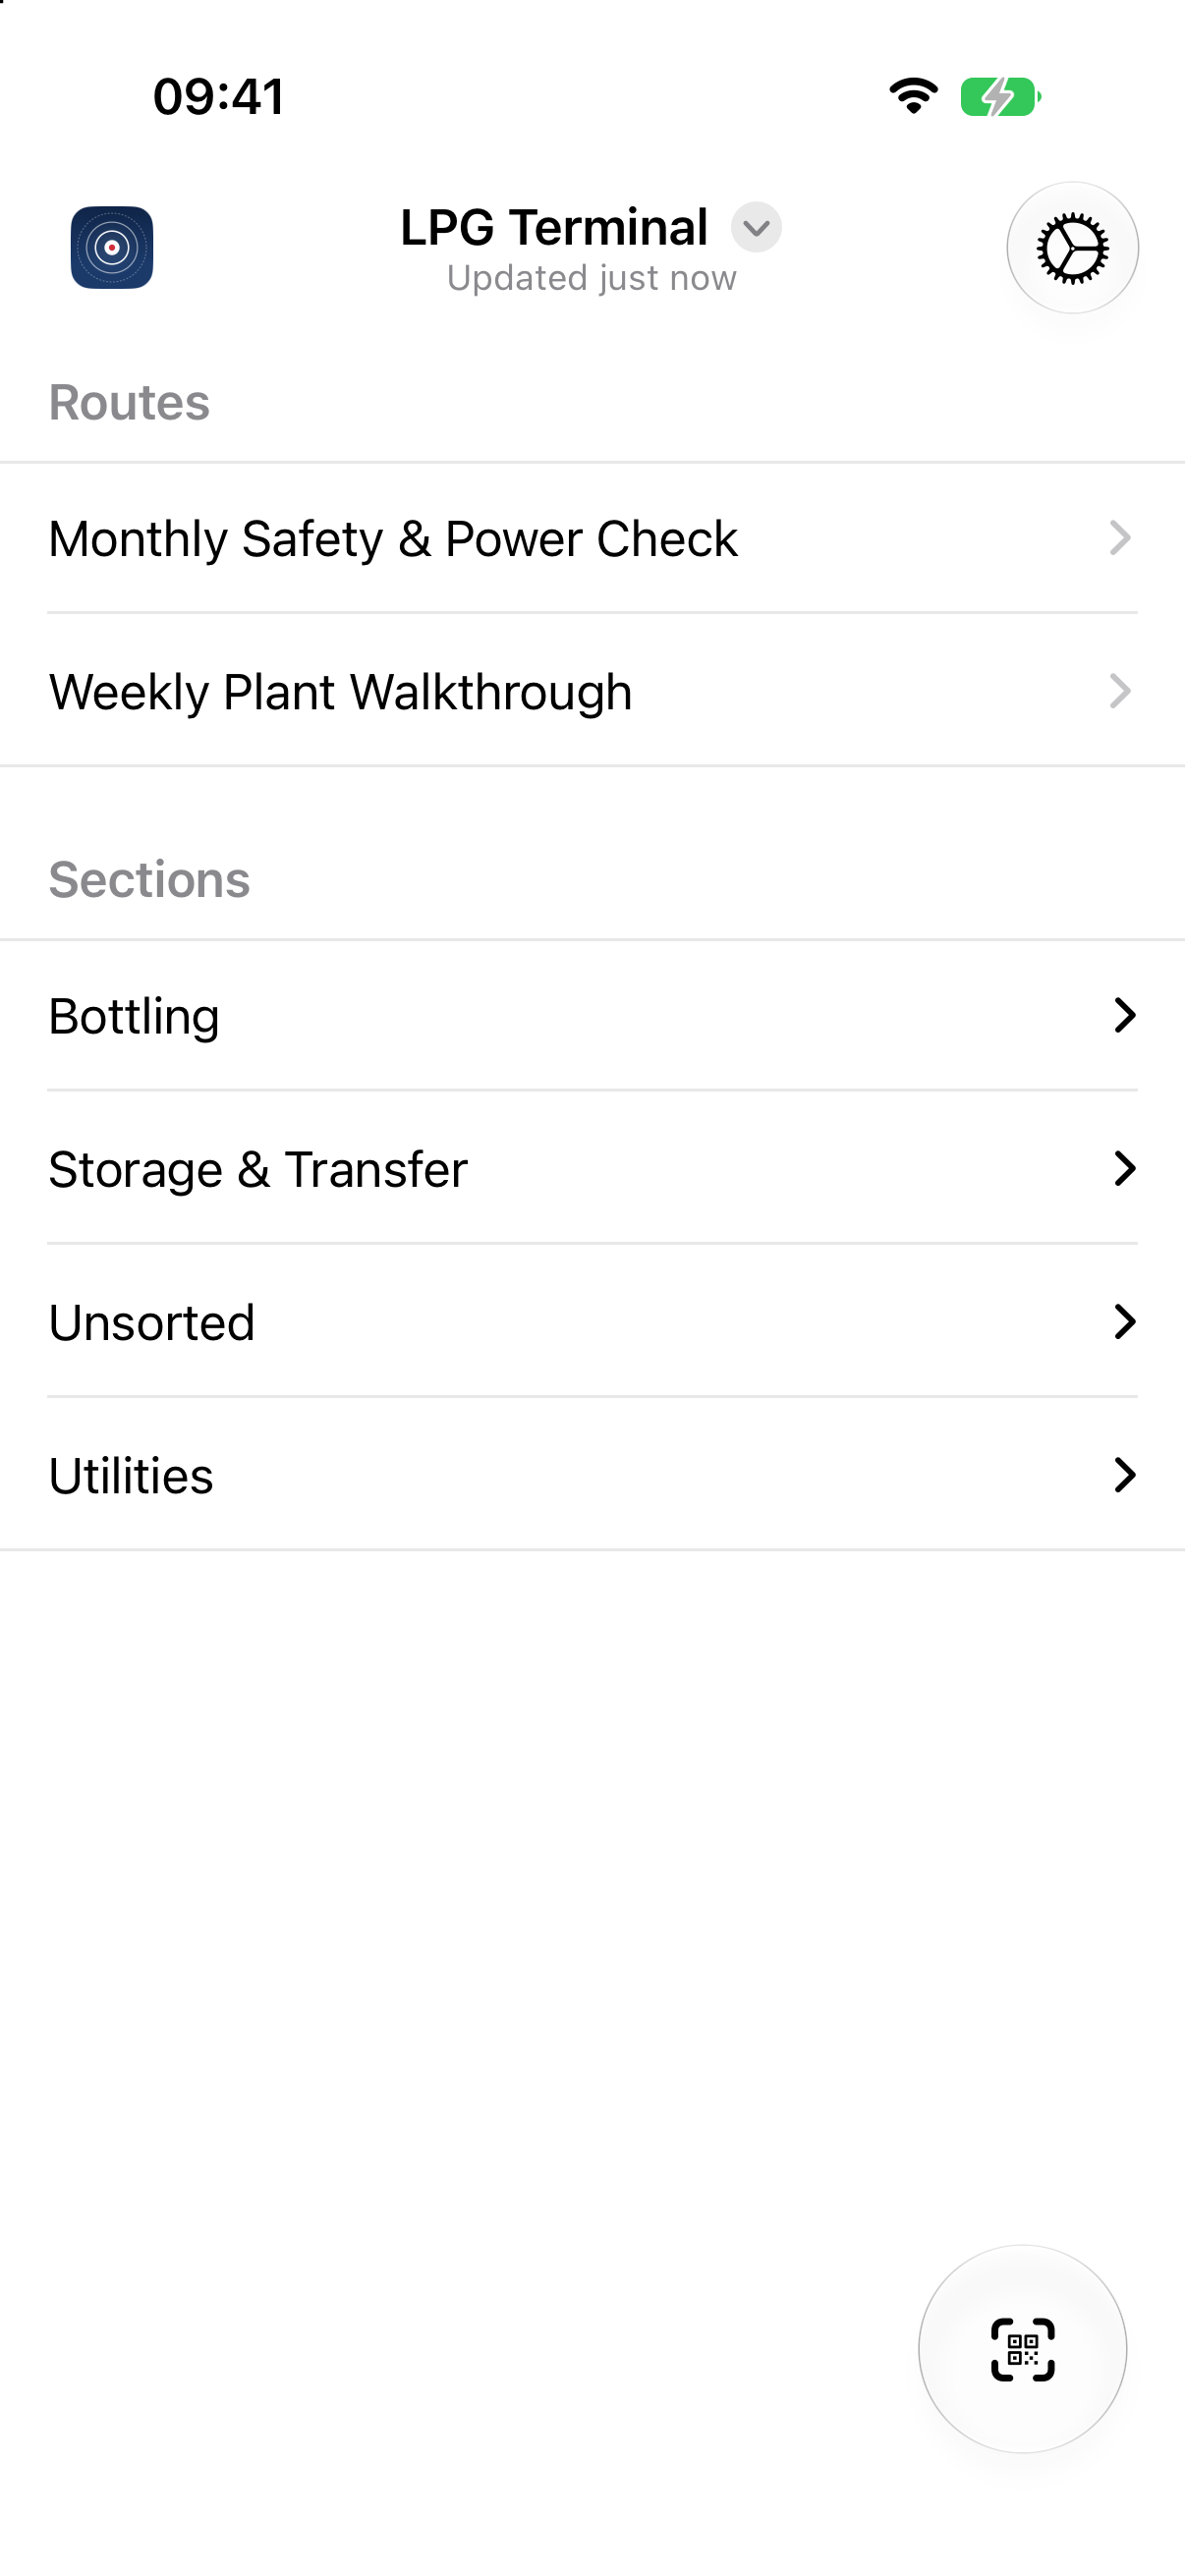
The site you’re in is the title at the top. Tap it to switch installations. Underneath, a status line tells you how fresh your data is — “Updated just now”, “Updated 11 min ago”, or “Updating…”.
Routes — your inspection routes, ready to walk. A dot marks a route with a run in progress.
Sections — browse the plant: Sections → Zones → Assets. Tap an asset to open it (next section).
Scan QR — the round button at the bottom right opens the scanner (see Finding things by QR).
Settings — the gear at the top right.
Pull down to refresh — force a sync whenever you want the latest.
Assets and points#
Tap an asset in the tree to open its screen: a breadcrumb (section › zone › equipment type), the asset’s photos, a Share link button that sends the asset’s web address to a colleague, and its Measurement Points.
Add Photo takes a picture with the camera (Take Photo) or picks one from the library (Choose from Library). Photos taken offline are marked Waiting to upload and go up on the next sync.
Tap a measurement point to take a one-off reading there, outside any route. The point screen shows its last value, a Recent list of readings, and its reference photo — tap the photo button to add or replace it.
Walking a route#
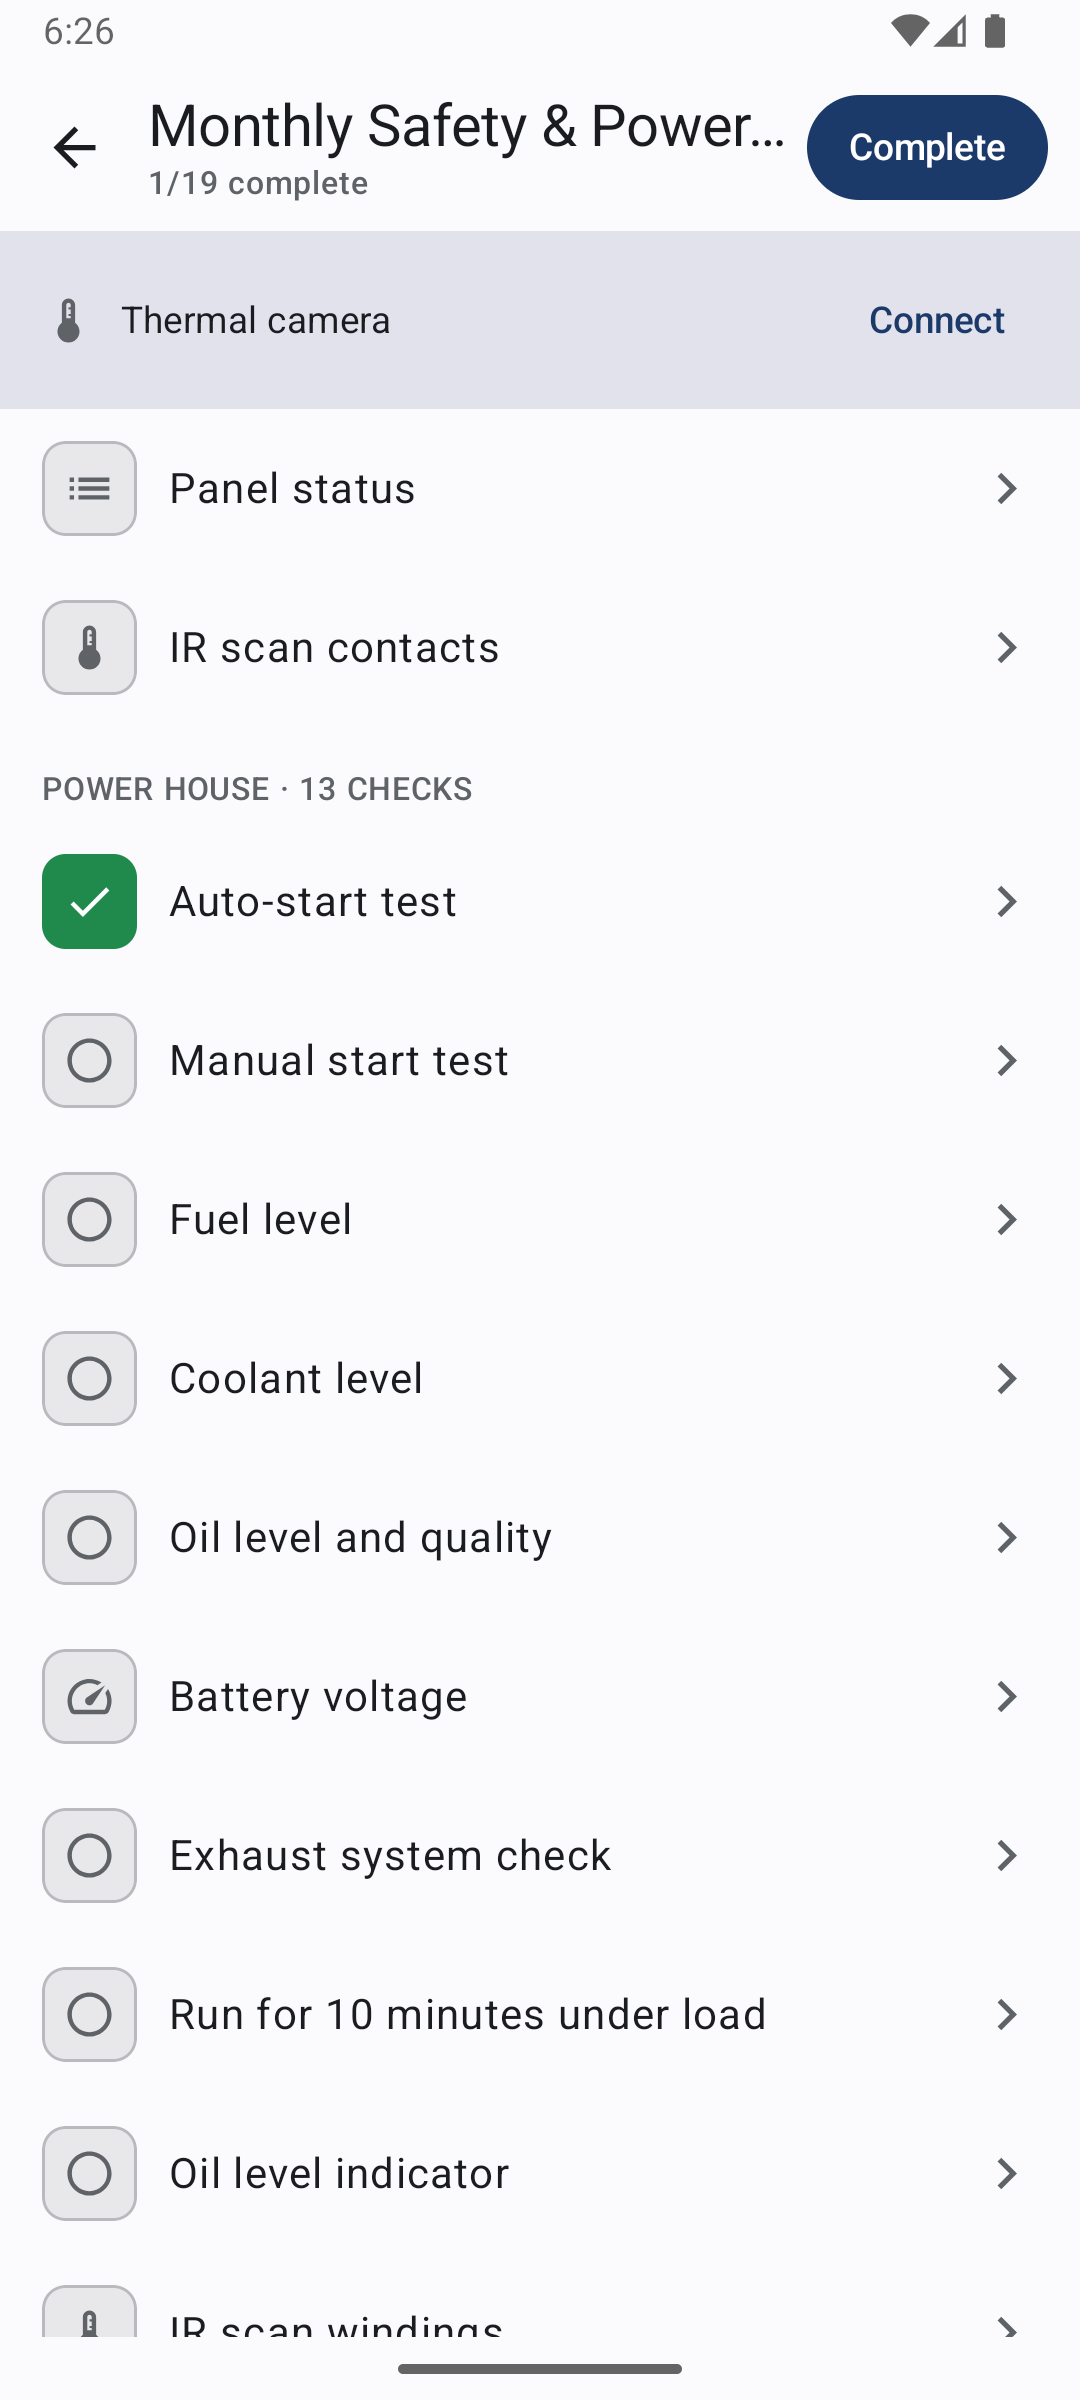
This is the apps’ main job. Open a route to see its checklist, grouped by stop, with a count of how many checks are complete.
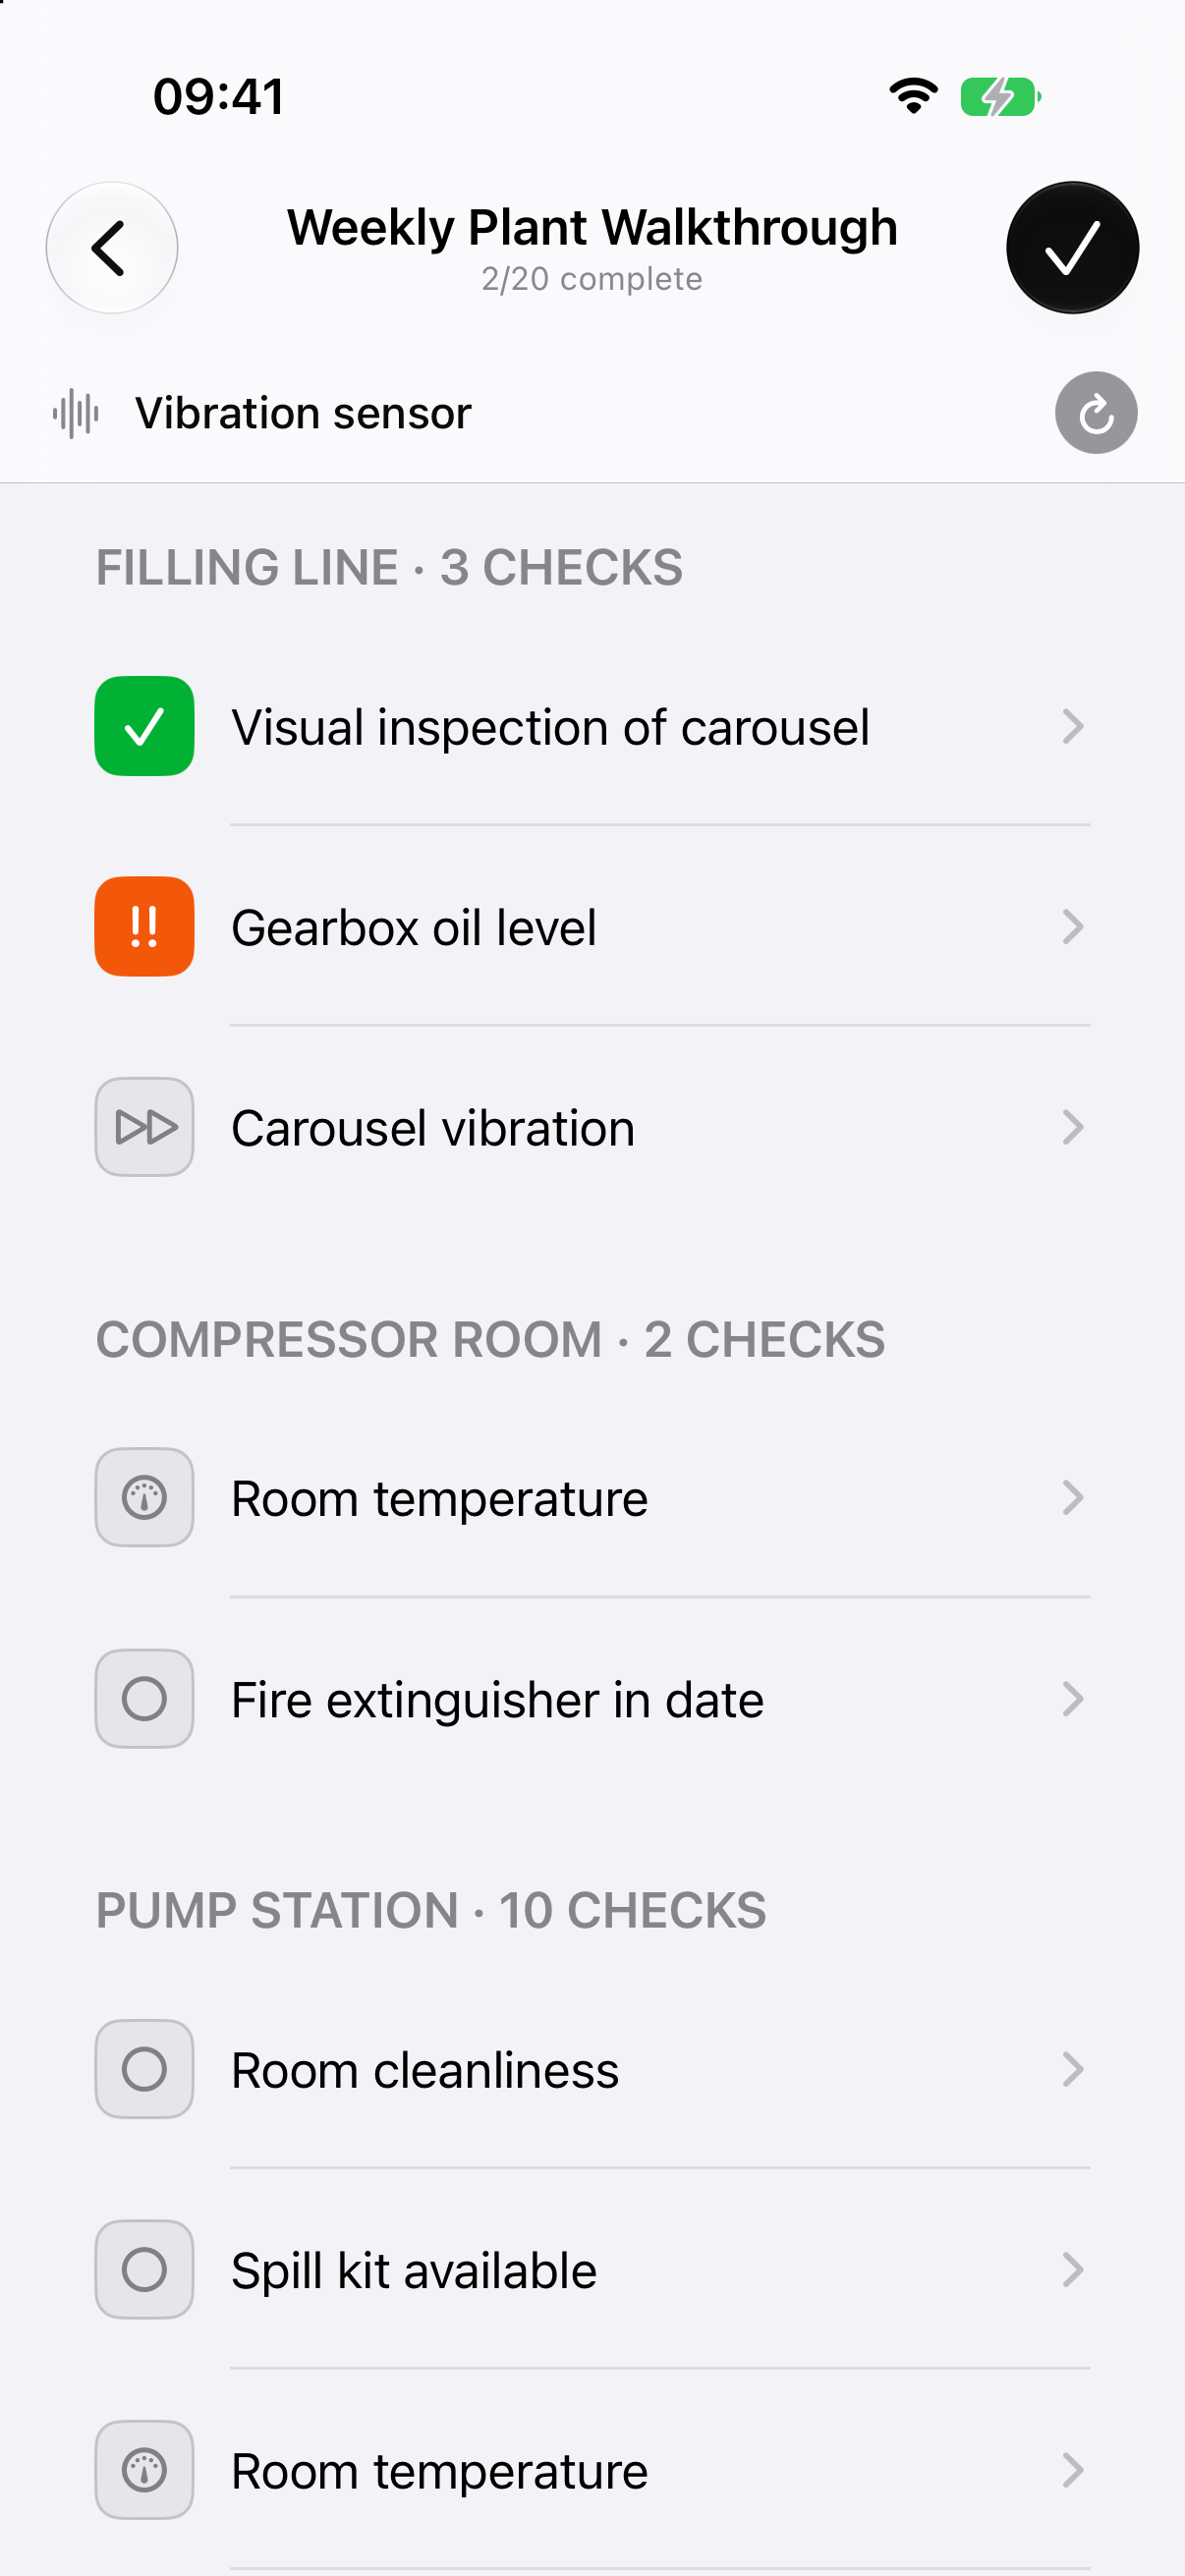
Each check’s icon tells you its type and, once answered, its result by shape — a
tick for a pass, ! for a minor and ‼ for a major failure, a skip mark for a
check you passed over. Tap a check to open it. You see where you are (Point 2 /
20), a progress strip across the top (tap it to jump), the breadcrumb, and the
right input for the check’s type:
Pass / Fail — tap the tick to pass: it records and moves on in one tap. Tap the cross to fail, then grade it Minor (
!) or Major (‼), which maps to a Warning or Critical non-conformity.Numerical — type the value you read off the gauge, in large type. If the check has limits, a bar under the value shows where it falls, with the verdict OK, Watch, or Alarm. The last reading is shown as a sanity check, and there’s a minus key for negative values.
Multi-check — several pass/fail steps bundled into one check (Checks 2 / 5), each passed or failed on its own.
Measurement — a reading on the asset’s measurement point, which flows into the point’s trend. For vibration and thermal points you capture it from a sensor (next section).
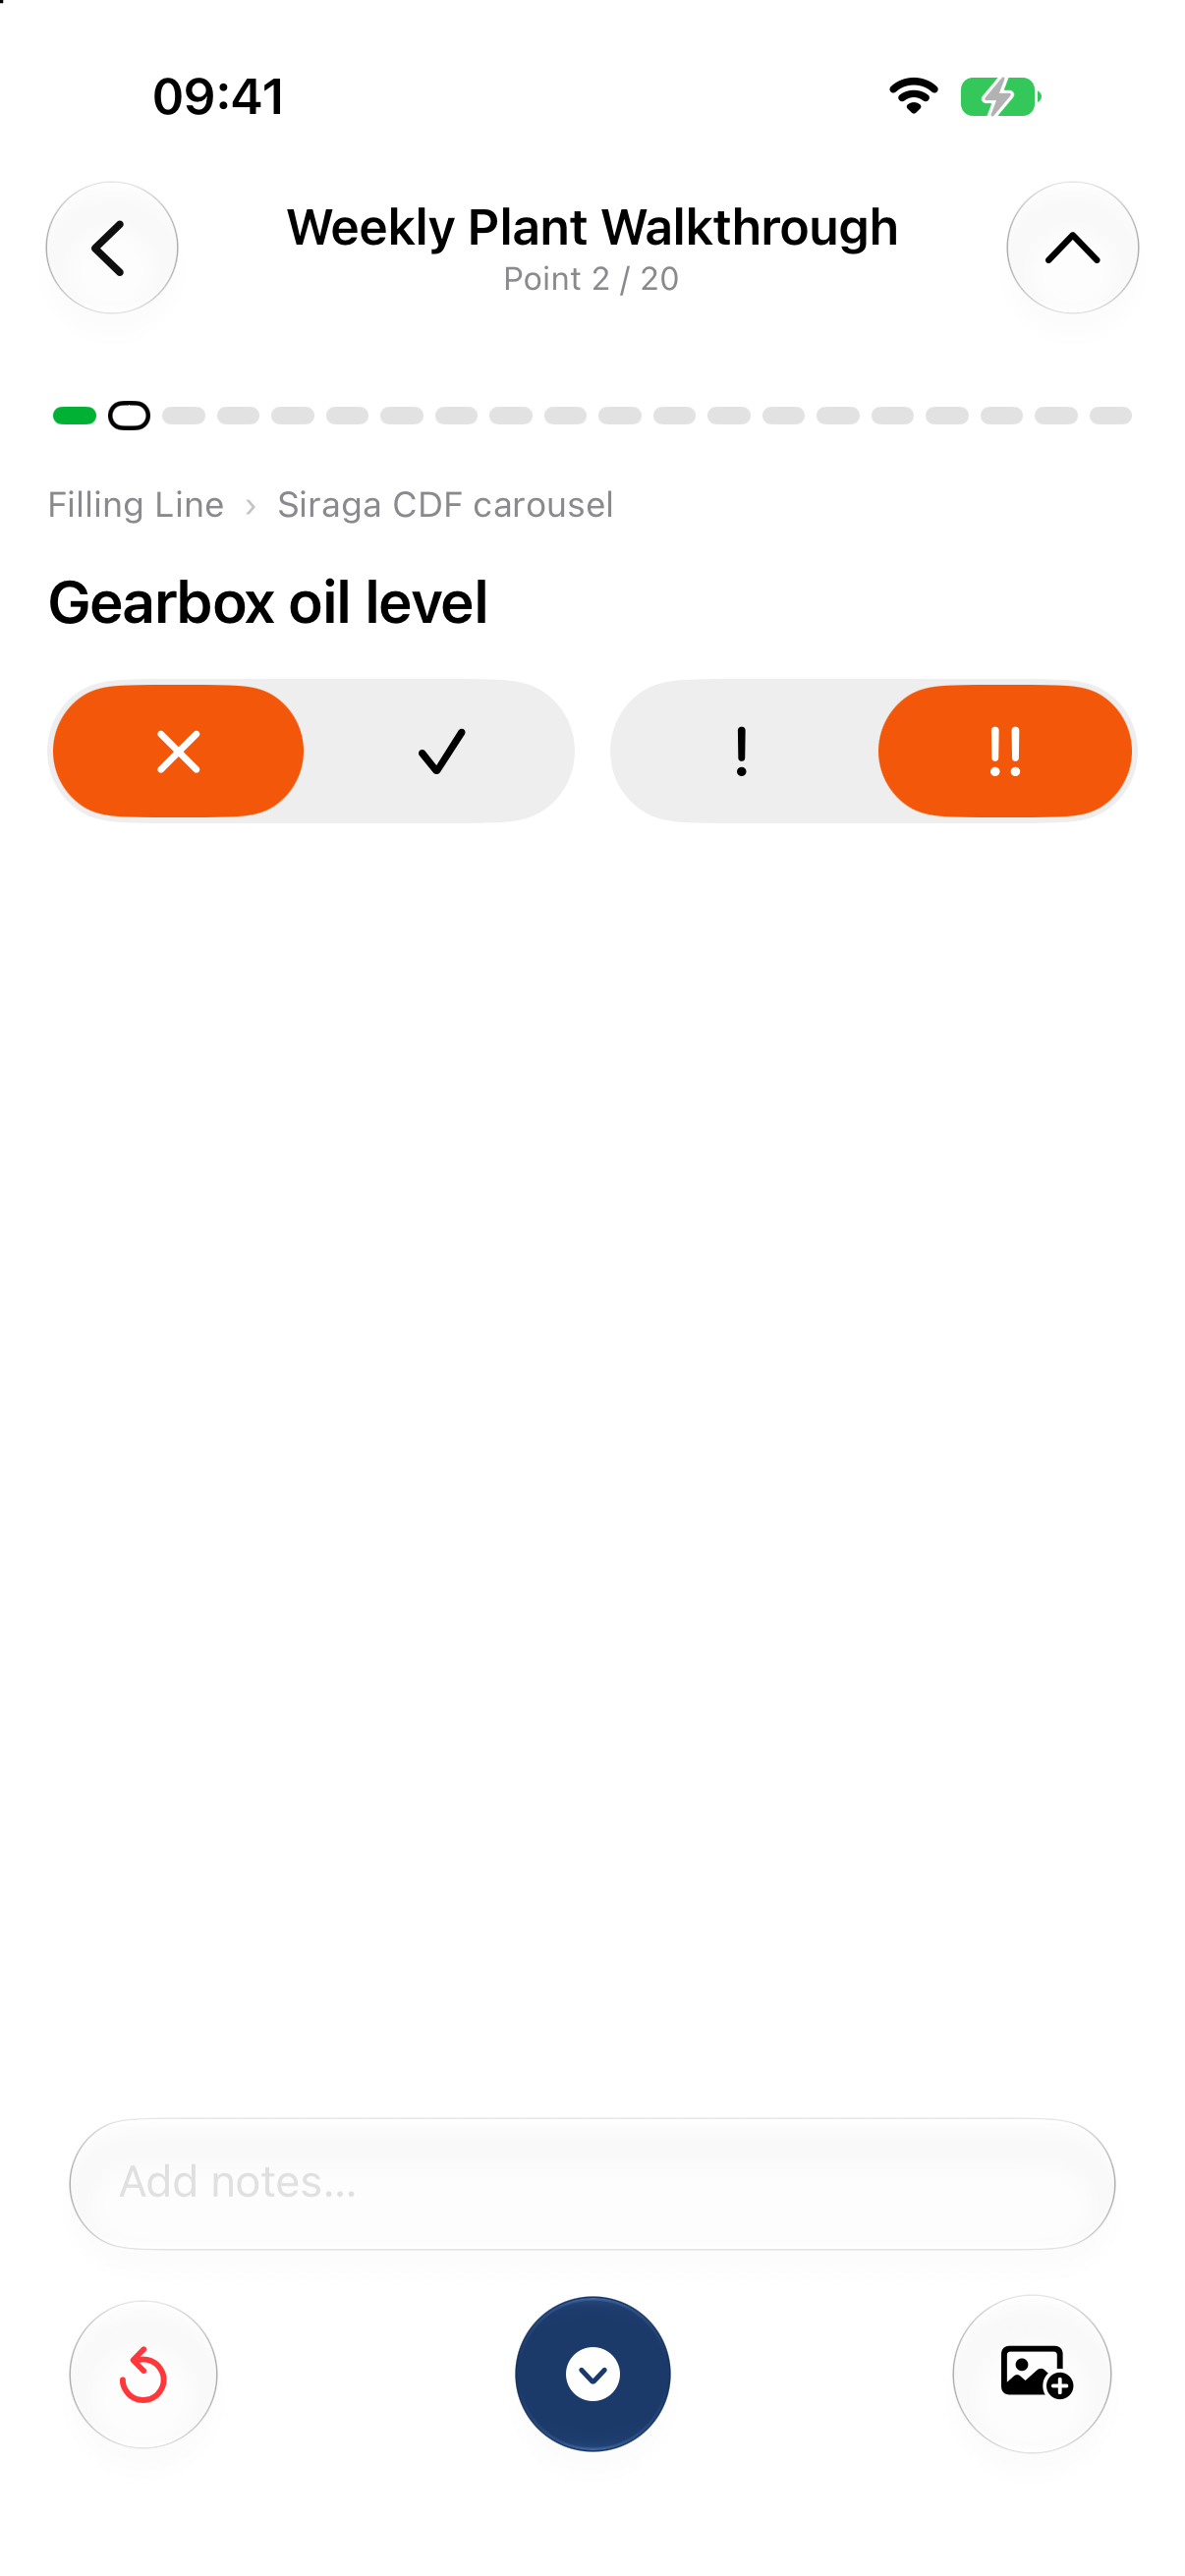
Every check also has Add notes… and a photo button. When a point has Instructions set on the web, they’re shown on the check — open the disclosure to read them.
The bottom bar moves you on: the centre button records the check and goes to the next (or Skips it if you haven’t answered), the arrow at the top goes back, and Clear wipes an answer — with an Undo for a few seconds. Scanning an asset’s QR tag while you’re in a route jumps straight to its check.
Tap the ✓ at the top right of the checklist to complete the run. On iPhone a Route completed bar with Undo appears on the home hub for a moment; on Android you’re asked to confirm if checks are still to do. You don’t have to answer everything — skipped checks are simply left unanswered, and can be filled in later on the web with Amend (Inspections and routes).
Note: A route has only one run in progress at a time. If a colleague already started today’s round, opening the route joins their run (“Joined a run already in progress on another device”), so you both add to the same report.
Capturing readings with sensors#
The biggest thing the apps do that the web can’t is capture live sensor data at the machine. A banner at the top of the route (or point) shows the sensor’s state — Connecting…, connected, Sensor lost — with Connect / Reconnect, and an ⓘ that opens step-by-step instructions for waking and linking it. The Capture button stays disabled until the sensor is connected.
Thermography — with a FLIR thermal camera. For a thermal point, the app connects to a FLIR ONE Edge camera and shows a live thermal preview with a temperature scale down the side. Options lets you set the Color palette (Iron by default), the Emissivity (Matte, Semi-matte, Semi-glossy, Glossy), and run a NUC recalibration. Capture a frame and the app automatically finds the hotspots — tap to add one, or tap a marker to edit it and grade it Minor or Major. Retake or Save; the thermal image and its hotspots attach to the reading, and a copy is saved to your photo library. A route check can hold several thermal frames.
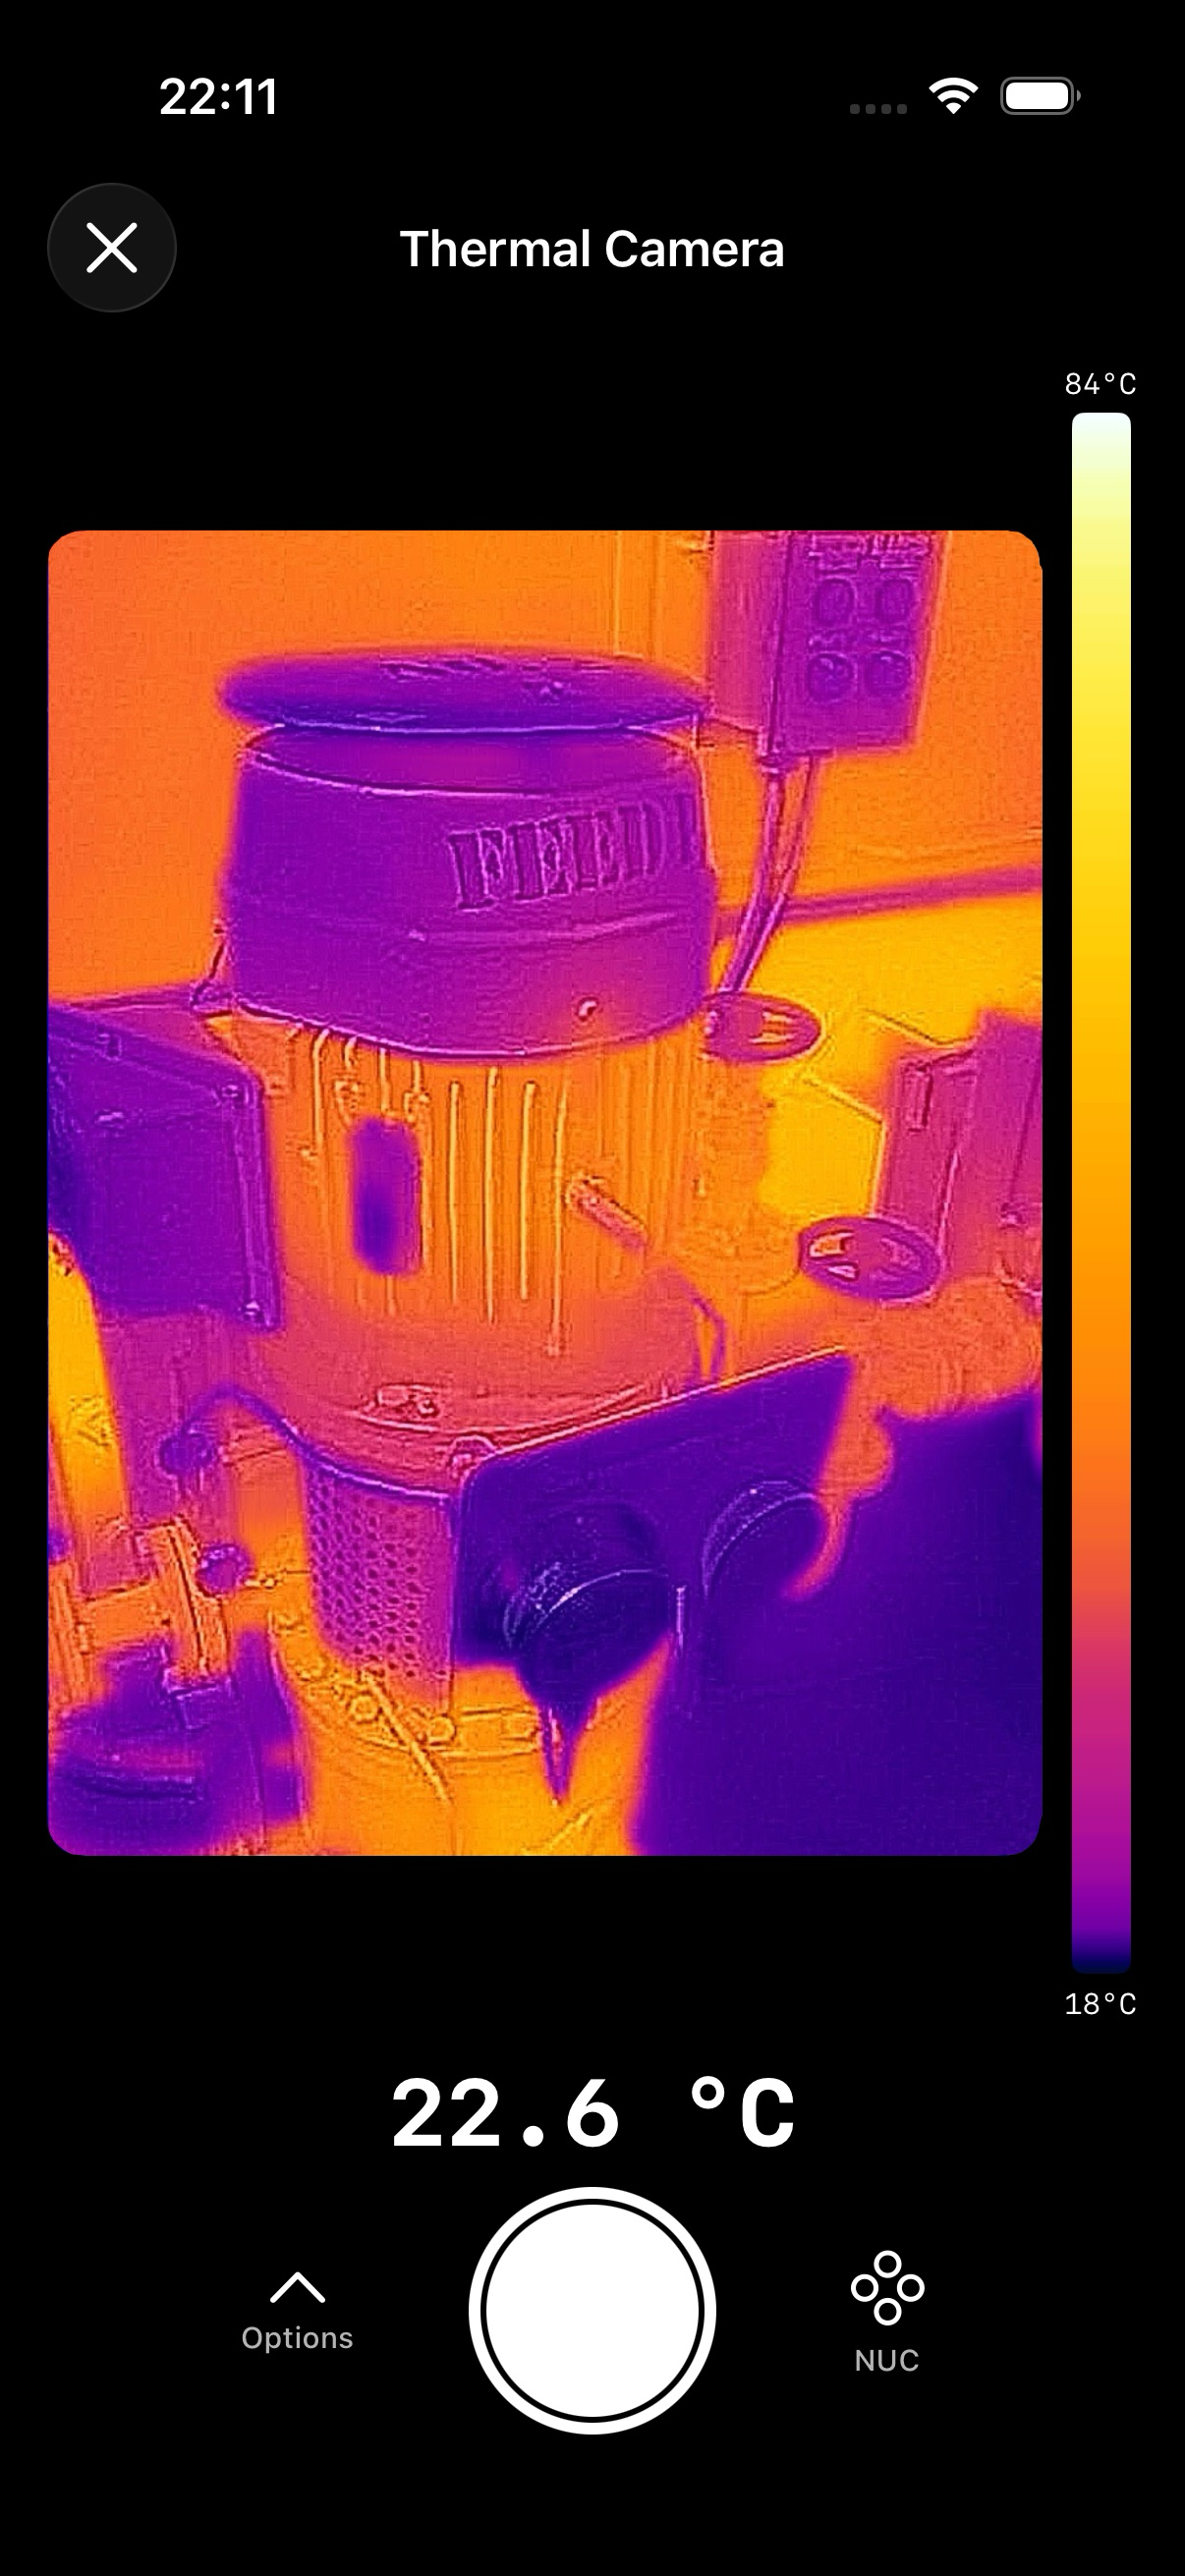
Once linked, the camera stays connected while you move between checks, so you don’t wait at every stop. Pulling down to refresh on the home hub drops the camera’s Wi-Fi link so the phone can reach the internet to sync.
Vibration — with a Bluetooth sensor. For a vibration point, the app pairs with a Bluetooth accelerometer (the TE 8531N wireless sensor). Pick the X, Y, or Z axis and capture: the sensor records about one second of waveform, and the app shows the RMS, Peak, Crest, and Vel 10Hz values together with the Waveform and FFT magnitude plots. Retake or Save; the full signature is attached to the reading — the same waveform an analyst opens on the web (Measurements, trends, and alarms).
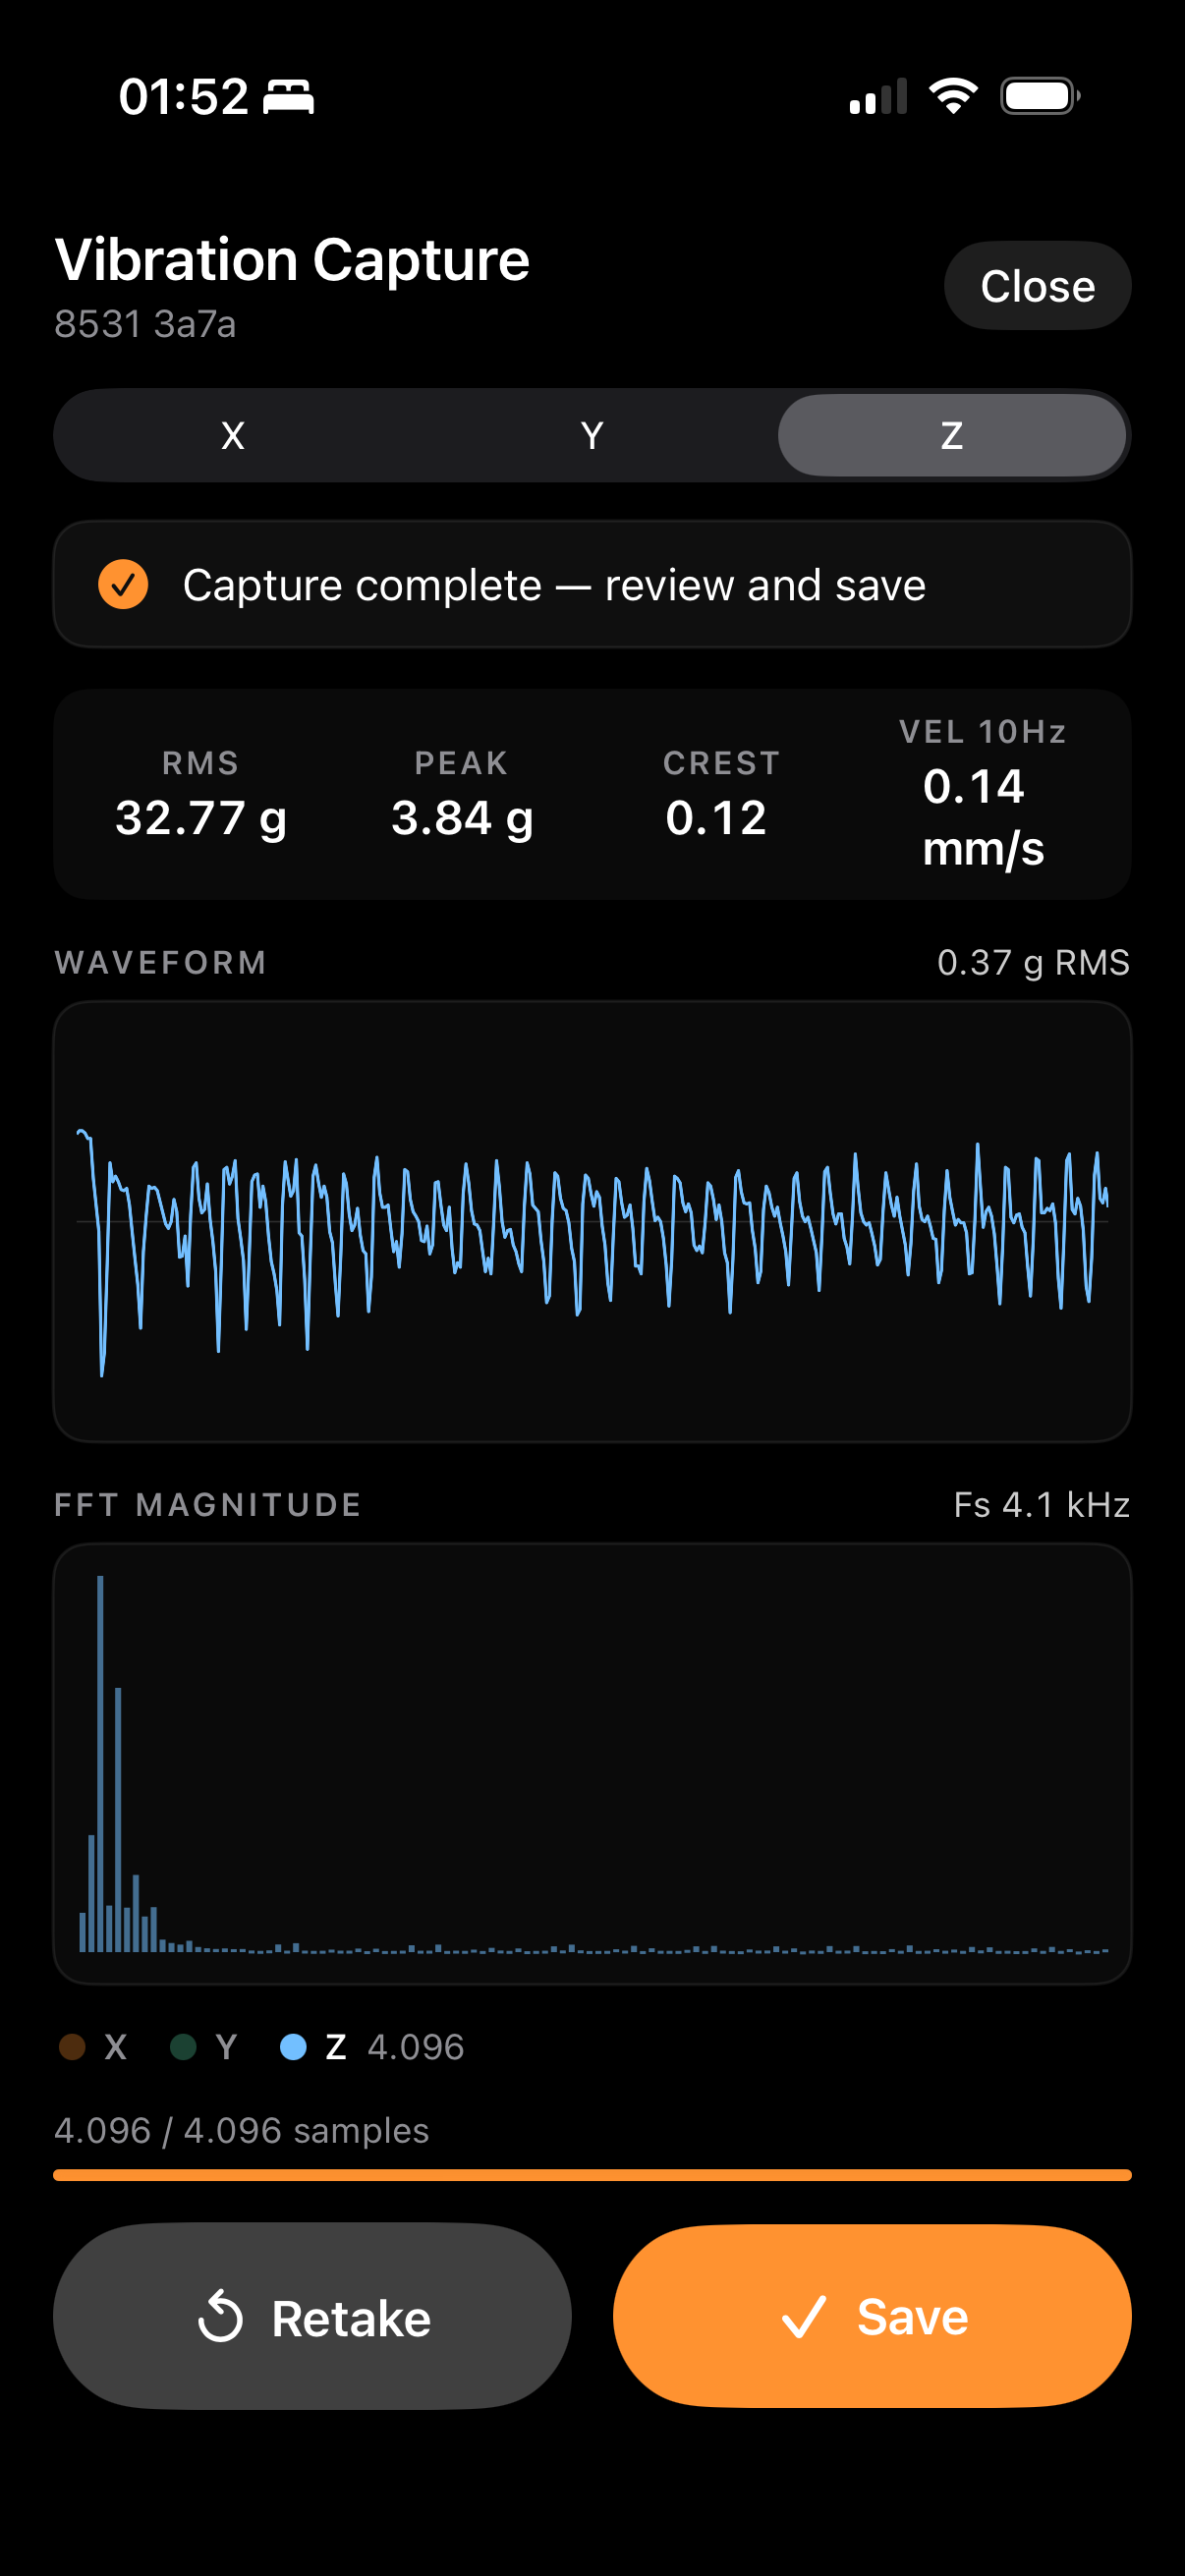
Tip: Wake the vibration sensor with a quick tap of the magnet (it stays awake for about an hour), and keep the phone close. On iPhone the thermal camera starts linking as soon as you open a route that needs it; tap Connect on the vibration banner when you reach the first vibration check. Android starts both, if you’ve already granted Bluetooth permission.
Finding things by QR#
Rather than drilling through the tree, you can scan a QR code placed on a piece of equipment. Tap the scanner on the home hub and point it at the tag: the app jumps straight to that asset or measurement point — or, if you’re in the middle of a route that includes it, to that check.
If the code belongs to a different installation, the app offers to Switch to it; if it isn’t a Mechbase code, it tells you so (“Not a Mechbase code”) rather than guessing.
Screenshot needed (iOS & Android): the QR scanner open against a real tag.
Working offline#
Plant rooms and remote sites don’t always have a signal, so the apps keep a local copy of your data and let you work without a connection:
Open routes, assets, and points, and walk a whole route offline.
Record results, readings, photos, thermal captures, and vibration signatures — all saved on the device first. A value you’re typing even survives the app being closed.
Everything syncs back to Mechbase automatically once you’re online again, in the background. The home hub’s status line tells you where things stand; pulling down forces a sync.
Heads-up: Signing out deletes anything on the device that hasn’t uploaded yet. The app warns you first (“You have N unsynced changes…”) — on a shared field phone or tablet, let it sync before you sign out.
Your vibration sensor#
Sensors are managed in the app’s Settings (the gear on the home hub), under Data Acquisition → Vibration Sensor.
You don’t have to pair anything in advance: with no sensor saved, the app connects automatically to the first TE 8531N it finds.
To fix a particular sensor to the phone, open Vibration Sensor, tap Scan, and pick it from Available sensors. Saved sensors can be removed with Forget. If nothing appears, wake the sensor with a magnet tap and keep the phone close.
The FLIR thermal camera needs no setup in Settings — it connects when you open a thermal capture.
Settings also holds your Account, with Sign Out.
Note: For mounting, wiring, ranges, and battery life of the wireless sensors, follow the sensor’s own user manual — it’s the authority on the hardware itself.
iPhone and Android#
The two apps are built to match — the same screens, the same route and capture workflow, the same offline behaviour, and the same FLIR and Bluetooth sensor support. A few details differ between them:
iPhone only: the Route completed bar with Undo, and a minus key for negative values on numeric checks.
Android only: a Complete route? confirmation when checks are still to do, a flashlight in the QR scanner, Undo when you remove a photo, and a Pending upload marker on routes waiting to sync.
Each follows its own platform’s navigation, styling, and permission prompts.
Here’s a route checklist on Android:
Anything you learn on one transfers directly to the other, and the data is identical to the web.